Typst packages - Why and How?
As of writing (version 0.11.1), Typst is rapidly approaching feature parity with LaTeX. However, as must necessarily be the case with anything new: the ecosystem to support it is still growing. Therefore, those who choose Typst will run into a problem sooner or later: “The package I need just doesn’t exist yet”
If at this point you choose nonetheless to persist with Typst, you’ll generally have a crack at implementing something that suits your specific use case, as was the case for me in a previous blog post about sparklines or table notes.
As I’ve recently been working on putting together some packages, now seems like a good a time as any to discuss the step that follows: sharing your implementation so others don’t run into the same speedbump.
The directory layout
At a minimum, a package consists of a manifest file (typst.toml), and an entry point (a typst file, generally lib.typ but you can choose whatever name). Generally though, you might want to include other files too, and very quickly it becomes a challenge to keep track of which files belong where. For this reason, the typst-community github organisation have put together a package-template repository. This section will go through how to get it setup and explain the lay of the land.
The first task is to fork the template repository. Navigate to https://github.com/typst-community/typst-package-template, and give it a name in the next menu. As of writing, there is no reason to change any of the defaults.

You should then have a repository to version control your package and to collaborate with others (just because it works for your use-case doesn’t mean other people can’t expand upon it).
There are between 2 to 3 different ways your package will end up being bundled, each a slimmed down version of the previous:
- This repository: All files
- Package repository: manifest, source, documentation PDF, README.md and any files it depends on, LICENSE
- What is sent to the consumer of your package when imported: source and assets that are required by your package such as images and fonts
- (for templates) Files that should make up a newly created projectusing the template: an entry point and example assets?
Files are filtered at certain levels where they have been listed in the exclusion blacklist, and so by default, all files are sent to the consumer. Therefore, it is important to keep in mind which files should make it to which stage, or, keep your directory structures meaningful. The template repository we picked opts for the directory structure:
/docs/containsmanual.typ(this repository) andmanual.pdf(also package repository)/scripts/are kept only on this repository/src/goes all the way to the consumer/tests/this repository only
This behaviour is defined explicitly in .typstignore (which concerns which files shouldn’t move from this repository to the package repository) and the manifest file typst.toml (which concerns which files shouldn’t move from the package repository to the consumer)
There are instructions for how to use the repository in README.md, so this guide will only go through things I found tricky when doing it myself.
just Do It
This template repository ships with some nifty scripts that are invoked using just. I won’t cover how to install it, but I will detail what scripts are made available to you and why they might be useful.
just ciwill make sure your tests don’t fail and then compile the documentation for youjust docwill compile the documentationjust installis the first step to testing that your package is shipable: It installs it locally under the@localnamespace, so you can test importing it.just install-previewdoes the same but under the@previewnamespacejust packagebundles everything will excluding things that shouldn’t be sent to the package repository.just testandjust updateconcern running tests and updating their reference images respectivelyjust uninstallandjust uninstall-previewwill uninstall packages from your local computer.
I don’t end up running these commands manually very often because of the release workflow I’ll discuss in the next section, but if you’re unsure and you want to dry-run a release, ci and package are the commands which are quite diagnostic.
The release workflow
Once you’ve taken care of everything, and then taken care of the things you forgot about (incrementing the package version in the manifest, updating the changelog, making sure the documentation is up to date), and tested that your package works when imported locally, its time to make a pull request into the package repository. This can be a faff to do manually, so the package template comes bundled with some github actions that will do the heavy lifting for us (as long as we do some lifting to get it setup first).
First things first, if we are doing a pull request into the package repository, we are going to need our own fork, which you can get started on here: https://github.com/typst/packages/fork. I strongly recommend naming the fork repository “typst-packages”.
Now, in our previous repository (the one for our package), navigate to .github/workflows/release.yml and make sure that line 10 properly points to this form we made.
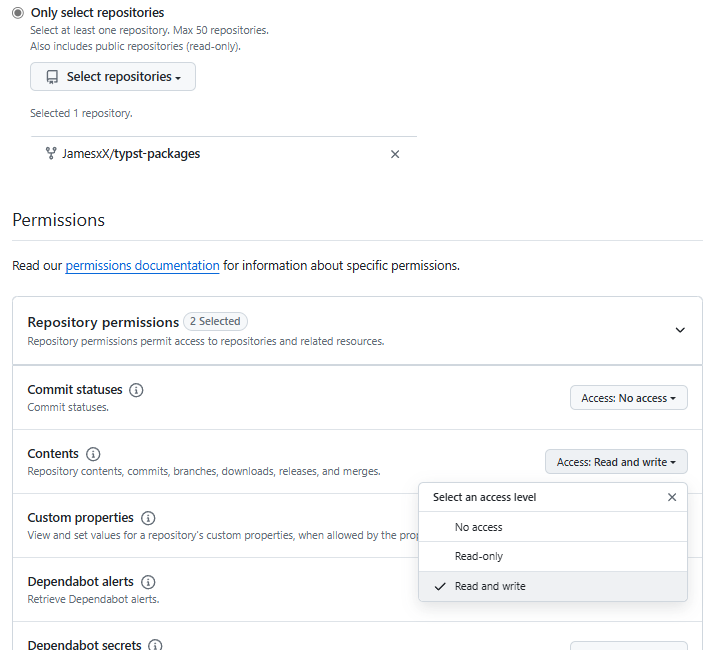
We need to give our workflow permission to do this heavy lifting for us (ci, package, make a new branch on the fork, copy our release into the right folders and commit), which is achieved by creating a creating a fin-grained personal access token (https://github.com/settings/tokens?type=beta). By generating a new token, selecting “Only select repositories” and choosing the “typst-packages” repo, and giving read-write access to contents as shown in the picture:
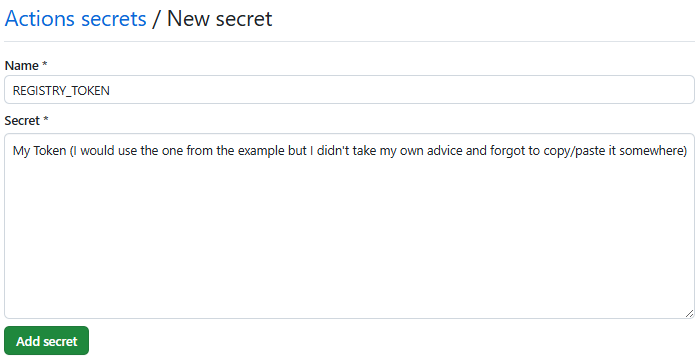
Once you’ve generated it, you will be given a key. Copy this (as you won’t be shown this again, you’ll need to delete it and redo the steps if you loose it) and keep it secret (as in, same level as “password” secret). The one shown in the picture is

The last thing to do now is to tell our github actions this key (which is in effect giving it those permissions). On GitHub, navigate to settings/secrets/actions on your repository, and add the new key
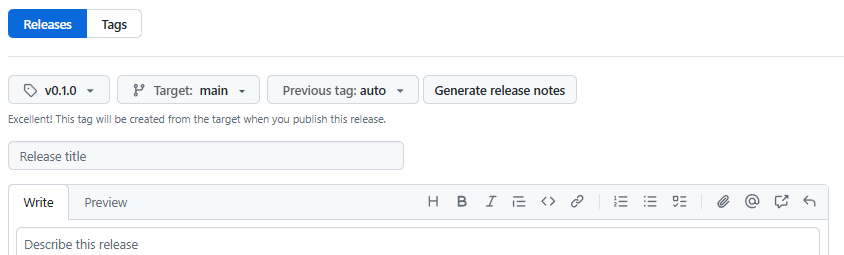
We’ve just done a whole lot of steps and I haven’t really said why: Now, we can publish our package by creating a release on GitHub! When we do, the workflow will automatically make a new branch on the fork we made, bundle our package, and commit it. All we need to do then is make the pull request. Easy as. To “press go” make a new release, and create a tag on release that has the version number you’re releasing: (e.g., v0.1.0 as the tag to release version 0.1.0). This is also a good place to list your changes!
Adding pictures to README.md
One thing you might find yourself wanting to do is add an image to the front page of your package. After all, it’s what’s shown on your repository, on the package repository, and on Typst Universe, and first impressions matter. The way I went about doing this was by creating a folder in my project’s root directory (which I called examples because that’s what the pictures were going to be), and include the pictures using html:
<img alt="Light" src="./examples/file.png">
Because of the multiple ways our project might be bundled, we now need to look into the .typstignore file and the typst.toml manifest to make sure it is being included/discard where needed. Importantly to my case (and therefore to the cases of others, probably), my file.png is generated from a typst file in the same directory, and we aren’t interested in distributing that.
To make sure that it gets included in the package repository (so it is shown on Typst Universe), we will edit the .typstignore file to add the following lines:
# Don't include anything from the examples directory
examples/*
# ... except png files
!examples/*.png
We don’t need these examples to be sent to the consumer because they don’t affect the functionality of the package, so we will make sure to exclude these from that point on by specifying as much in the manifest
# ...
exclude = [
# ...
    "examples", # exclude examples
]
And that’s all: png files in examples are bundled but not sent to the consumer.
Release, Promote, Collaborate, Repeat
Creating a package is just the first step. As I mentioned earlier, the problem you were trying to solve when you wrote the package is most likely not a problem that is exclusive to you. Saving others any wasted time includes making the package, but it includes making them aware of the package (meaning they can spend more time writing packages for the problems they’ve run into in their usecases). The Typst Discord server is a great place to do this!
The other thing I mentioned earlier is that your use-case might just be a narrowing of a more general problem. Being open to suggestions and pull requests means you can go from a good package to a great package. That being said, not everyone has the time to maintain a project, so you might also want to consider asking the community if there’s anyone who would like to take the reins from you.
Further Reading
What this post didn’t cover is how to make a nice documentation PDF (see the tidy or mantys packages).
It didn’t talk about what makes for an intuitive API within the typst ecosystem (see Tingerrr’s guidelines on the typst-community GitHub organisation https://github.com/typst-community/guidelines).
Typst’s is still being actively developed, and in the pipeline is custom types. This will likely change how we lay our packages out, and so this guide might become out of date.